Posted in Cybersecurity Careers
This project is to show the simple steps to take when configuring a Dedicated NAT Network and Ip address on…
HOROIHEOMA C. — Cybersecurity Analyst
This project is to show the simple steps to take when configuring a Dedicated NAT Network and Ip address on an already existing VM and kali attack machine.
Setup a Cybersecurity testing lab environment on your Laptop/PC with below detail:
•
Use Virtualbox as base (latest recommended version)
•
Setup Kali Linux as attacking/hacker machine
•
Setup the network in subnet 10.0.0.0/24
•
Use NATNetwork with 10.0.0.0/24
•
The clipboard & file drag/drop should be enabled in Virtual Machine settings
•
Shared folders should be enabled with /downloads folder shared from host machine
•
Kali Linux IP Address should be 10.0.0.2/24
•
Kali Linux should have full Internet access
Before this project, if you have an already installed Oracle virtual box and a kali linux machine, and you are unable to configure the dedicated ip 10.0.0.0/24 manually, you can do so using prompts.
How to Setup the network in subnet 10.0.0.0/24 on both your Oracle virtual box and kali linux using command prompts if you are unable to do that manually.
Follow the below steps (See Method 2)
Step 1: Create the NAT Network in VirtualBox
Do this on your Windows host, not inside Kali Linux.
Shut down your Kali VM completely.
Open VirtualBox Manager.
Open Tools → Network (in some versions, this is under File → Tools → Network).
Select the NAT Networks tab.
Click Create or the + icon.
Configure the network as follows:
Setting
Value
Name
CyberLab-NAT
IPv4 Prefix / Network CIDR
10.0.0.0/24
DHCP
Disabled (recommended for this fixed IP setup)
7. Ensure the NAT Network is enabled, then click Apply if shown.
If your VirtualBox version uses a different menu layout, look for NAT Networks in the Network settings.
Step 2: Change the existing Kali network adapter
In VirtualBox Manager, select your Kali VM.
Click Settings → Network → Adapter 1.
Ensure Enable Network Adapter is checked.
Change the settings to:
Attached to
NAT Network
Name CyberLab-NAT
Cable Connected Checked
5. Click OK.
If The above procedure didn't work, Try running only commands
See Below
Step 1: Check your VirtualBox version
Method 1 — From VirtualBox Manager
Open Oracle VM VirtualBox.
Click Help on the top menu.
Select About VirtualBox.
You should see a version number, for example 7.1.6 or 7.2.0. or 7.2.14 or 7.2.22
Method 2 — Using Windows Command Prompt
Press Windows + R.
Type cmd and press Enter.
Run this command: "C:\Program Files\Oracle\VirtualBox\VBoxManage.exe" --version
Step 1: Open Command Prompt
Press Windows + R.
Type cmd.
Press Enter.
Step 2: Create your NAT Network
Copy and paste this command, then press Enter:
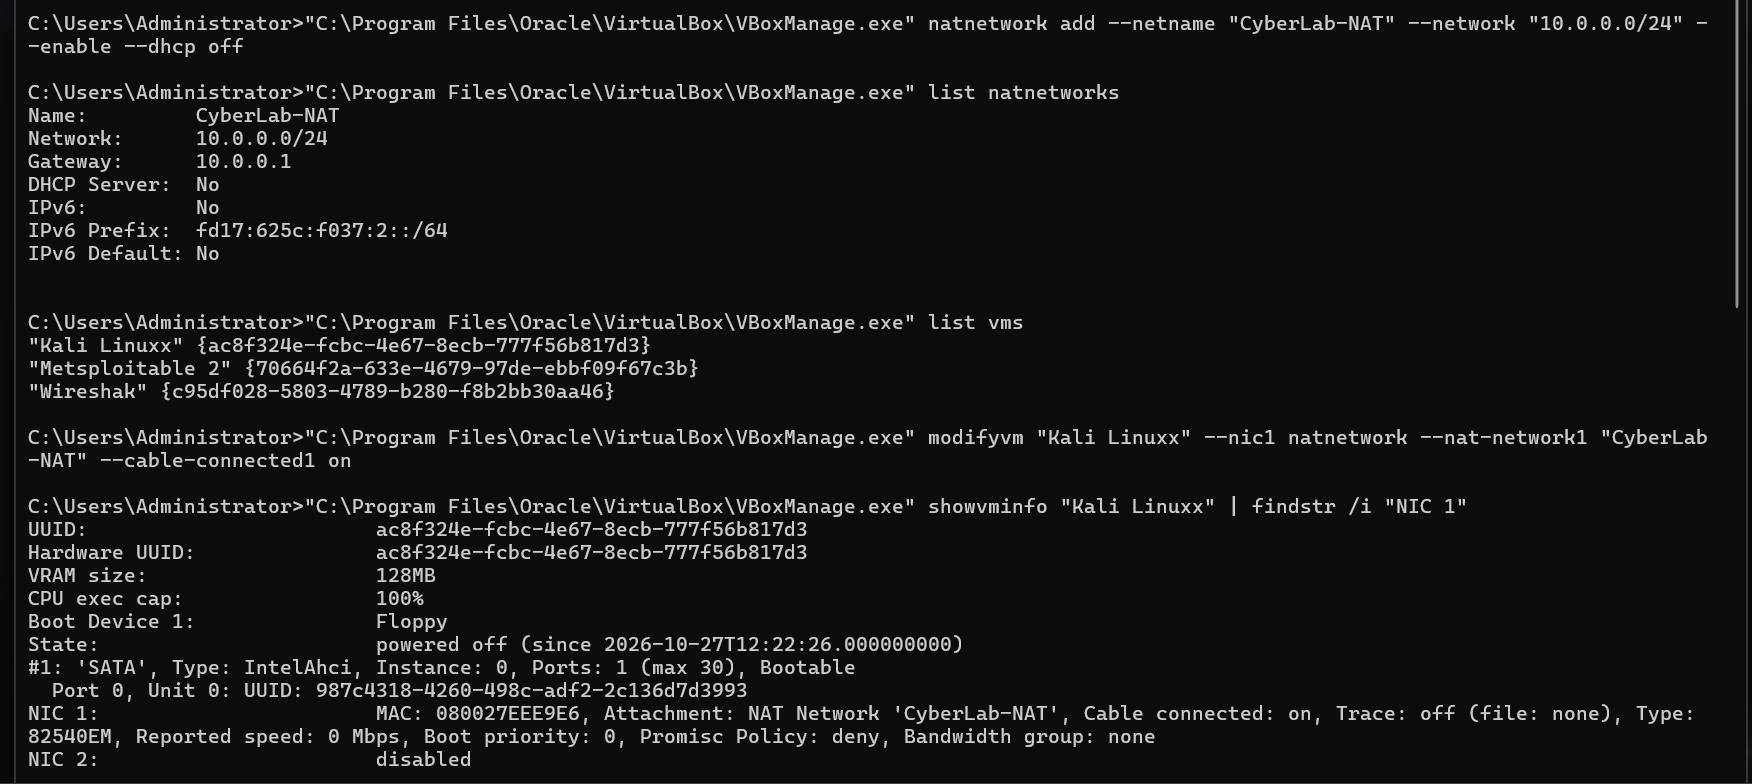
"C:\Program Files\Oracle\VirtualBox\VBoxManage.exe" natnetwork add --netname "CyberLab-NAT" --network "10.0.0.0/24" --enable --dhcp off
Step 3: Verify it
Run: "C:\Program Files\Oracle\VirtualBox\VBoxManage.exe" list natnetworks
Look for CyberLab-NAT and 10.0.0.0/24
Now let's connect your existing Kali VM to it.
Step 4: Connect Kali to CyberLab-NAT
Open VirtualBox Manager.
Select Machines from the left sidebar and select your Kali Linux VM.
Ensure Kali is powered off.
Open the VM's Settings.
Select Network → Adapter 1.
Change Attached to from NAT to NAT Network.
Select CyberLab-NAT as the network name.
Ensure Enable Network Adapter and Cable Connected are checked.
Click OK.
If Your VirtualBox has the CyberLab-NAT network created, but the VM settings only show NAT and Bridged Adapter meaning you are unable to change it manually, use the steps below.
You do not need to reinstall Kali. Let's check whether VirtualBox recognizes the NAT Network and your exact Kali VM name using Command Prompt. This avoids changing settings blindly.
Step 1: Find your Kali VM's exact name
"C:\Program Files\Oracle\VirtualBox\VBoxManage.exe" list vmsOpen Windows Command Prompt and run:
You should see something like "Kali Linux" {xxxxxxxx-xxxx-xxxx-xxxx-xxxxxxxxxxxx}
Step 2: Connect Kali to CyberLab-NAT using a command
Make sure Kali is powered off. Replace Kali Linux below with the exact VM name from Step 1, then run:
"C:\Program Files\Oracle\VirtualBox\VBoxManage.exe" modifyvm "Kali Linux" --nic1 natnetwork --nat-network1 "CyberLab-NAT" --cable-connected1 on
This configures Adapter 1 to use your existing NAT Network.
After running the command, verify the configuration with:
Step 3: Verify the change
Run: "C:\Program Files\Oracle\VirtualBox\VBoxManage.exe" showvminfo "Kali Linux" | findstr /i "NIC 1"
You should see that Adapter 1 uses natnetwork and CyberLab-NAT.
Your output confirms that Kali Linux is successfully connected to CyberLab-NAT. You do not need to change anything else in VirtualBox networking at this stage.
Next: Configure Kali's IP address
Step 1. Start your Kali Linux virtual machine and open Terminal.
Step 2. Run: nmcli connection show
You should see a list of network connections. Look for a name such as Wired connection 1
Look for the active wired connection name, such as Wired connection 1.
Step 3. Use the following command, replacing Wired connection 1 if your connection has a different name:
Run: sudo nmcli connection modify "Wired connection 1" ipv4.method manual ipv4.addresses 10.0.0.2/24 ipv4.gateway 10.0.0.1 ipv4.dns "1.1.1.1 8.8.8.8"
Step 4. Apply the settings:
Run: sudo nmcli connection up "Wired connection 1"
Step 5. Verify the IP address:
Run: ip -br address
You should see 10.0.0.2/24 on your network interface.
Then test internet connectivity:
ping -c 4 1.1.1.1
If that succeeds, test DNS:
ping -c 4 google.com
Let's configure the static IP and test connectivity.
Step 1: Exit the connection list
Step 2: Configure Kali's IP address
Copy and run this command inside the Kali Terminal:
sudo nmcli connection modify "Wired connection 1" ipv4.method manual ipv4.addresses 10.0.0.2/24 ipv4.gateway 10.0.0.1 ipv4.dns "8.8.8.8 1.1.1.1"
Enter your Kali password if prompted.
Step 3: Activate the connection
Run: sudo nmcli connection up "Wired connection 1"
If successful, NetworkManager should report that the connection was activated.
Step 4: Test the network
Run these commands one at a time:
ip -br address
ip route
ping -c 4 10.0.0.1
ping -c 4 8.8.8.8
Your expected configuration is:
Kali IP: 10.0.0.2/24
Default gateway: 10.0.0.1
NAT Network: CyberLab-NAT
Your Kali network is now configured correctly, and the results confirm that your Kali VM has internet connectivity through the VirtualBox NAT Network. 🎉
Your current lab status
NAT Network
CyberLab-NAT — 10.0.0.0/24
Kali IP address
10.0.0.2/24
Default gateway
10.0.0.1
Gateway connectivity
4/4 packets received
Internet connectivity
8.8.8.8 — 4/4 packets received
One final network test
Run this command inside Kali to verify DNS resolution:
ping -c 4 google.com
If it succeeds, both internet connectivity and DNS are working.
2 reactions · 0 comments